If you’ve ever stood in front of a bathroom mirror at 7 a.m., fumbling for a light switch with one hand while holding a razor or lipstick in the other, you’ve probably daydreamed about a simpler way to brighten your space. That’s exactly the moment many homeowners and property managers reach for a mirror sensor switch—those sleek, touch-sensitive devices that mount right to the back of a vanity mirror, turning lights on and off with a single tap of glass. But for anyone looking to upgrade their space, the biggest question is always the same: Are mirror sensor switches easy to install? As a supplier who’s spent years walking installers and DIYers through every step of bringing these products to life, I’m here to break that down, no industry jargon, no overpromising—just real talk about what to expect. Mirror Sensor Switch
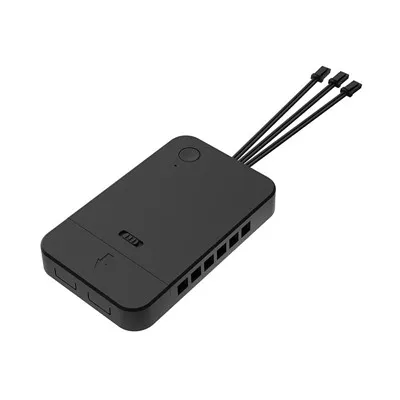
First, let’s get one thing straight: Mirror sensor switches aren’t like your old standard light switches. They’re purpose-built to sit behind or along the edge of a mirror, designed to pair perfectly with LED vanity lights, backlit mirror strips, or even under-cabinet lighting. That niche design is part of what makes them easy to install, but it’s also important to manage expectations—this isn’t a 15-minute job for someone who’s never held a screwdriver, but it’s also not a full-home rewiring project that requires an electrician’s license. Most of the time, it’s something a handy homeowner can tackle on a Saturday afternoon, as long as you have a few basic tools and take the time to follow the right steps.
Let’s start with the basics of what’s actually involved in installing a mirror sensor switch. Unlike a standard wall switch that mounts to a stud and connects directly to your home’s main electrical box, mirror sensor switches typically run on low-voltage wiring, which is a big plus for safety and ease. The main components are: the sensor unit itself, which is a thin, flat plastic piece (usually 1 to 2 inches wide) that has a copper touch pad on one side; a power adapter that plugs into a standard wall outlet or connects to a low-voltage transformer; and a set of wires that link the sensor to your vanity lights. That’s it—no heavy gauge wires running through walls, no need to turn off your entire home’s power unless you’re working near the main box, and no need to patch drywall when you’re done.
The first step, and honestly the most important one, is measuring and marking where you want the sensor to go. Most people opt for a spot along the bottom edge of the mirror, or 6 to 12 inches above the sink, so it’s easy to reach without leaning over. Here’s where many new DIYers slip up: you can’t just stick the sensor anywhere. The touch pad needs to be in direct contact with the back of the mirror—you can’t mount it on the wall next to the mirror, because the sensor won’t pick up the touch signal. That’s why I always tell customers to test their mirror first: hold a smartphone close to the back of the mirror and tap lightly—if you can feel a faint vibration or see a change on the screen, that’s a sign the mirror is glass, not a frosted or plastic alternative, which works perfectly with these sensors. If your mirror is a vintage leaded glass or a heavily tinted one, you might need to adjust the placement slightly, but 90% of standard vanity mirrors work right out of the box.
Once you’ve marked the spot, the installation is mostly about mounting and wiring, and that’s where the “easy” part really kicks in. Most mirror sensor switches come with double-sided adhesive foam tape for mounting, so you don’t need to drill a single hole in the mirror. Wait—drilling a mirror? I know that sounds scary, but you don’t have to do that. The adhesive is strong enough to hold the sensor in place, even if your mirror is 50 pounds or more; I’ve had customers tell me their sensor has stayed put for two years, through steam from showers and cleaning products, no issues. If you’re worried about it falling, you can add a small amount of clear silicone caulk along the edges of the sensor for extra hold, but that’s totally optional.
Wiring is the next step, and this is where having basic household electrical knowledge comes in handy. Here’s the good news: mirror sensor switches use low-voltage wiring, which means the voltage is less than 24 volts—way less than the 120 volts in your standard wall outlets, so the risk of shock is almost non-existent. Most units come with pre-stripped wires that you just twist together with wire nuts (included in almost every kit) or plug into a quick-connect terminal block, no crimping tools required. The power adapter usually plugs into a nearby wall outlet—many customers mount the adapter behind their vanity cabinet, out of sight, so it doesn’t ruin the clean, sleek look of the mirror. If you’re connecting to hardwired lights (like built-in LED strips in a backlit mirror), the process is just as simple: the sensor has two wires labeled “load” that you connect to the light’s power wires, and the power adapter connects to the sensor’s “input” wires. I always include a color-coded wiring diagram in every kit, and most suppliers will send a free PDF version if you lose the paper one—no guessing which wire goes where.
But wait—what about the times when it’s not that easy? No product is perfect, and mirror sensor switches have a few limitations that are worth mentioning. First, if you’re dealing with a very thick mirror (over 1/2 inch) or a double-sided mirror (used in some gyms or retail spaces), you might find that the sensor’s touch signal is weak. That’s because the sensor is designed to work through standard glass, and thick or coated glass can block the signal a little. In that case, you might need to use a sensor with a longer touch range, or mount the sensor directly on the front of the mirror (most units come with a small mounting plate for that, too). Second, if you’re connecting to a light that draws more than the maximum load of the sensor (usually 50 watts for most residential units), the switch might turn off unexpectedly or fail to power the light. That’s an easy fix—just check the light’s wattage before you buy, or upgrade to a higher-load sensor, which is still simple to install.
Another common question I get: Can I install this myself, or do I need to hire an electrician? Let’s be real—electricians are great, but they’re also expensive. For most homeowners with basic DIY skills, installing a mirror sensor switch is a project that takes about 30 minutes, start to finish, and costs less than $50 in tools (most people already have wire nuts, a screwdriver, and a tape measure at home). If you’re comfortable working with exposed wires around low voltage, you don’t need a license. If you’re nervous about even that, though, a handyman or a junior electrician can install it in an hour for $100 to $150, which is a small cost for the peace of mind. I always tell first-time buyers to start with a simple plug-in unit, not a hardwired one—plug-in units require even less wiring, since you just plug the power adapter into an outlet, no need to connect to the light’s wires directly. That’s the easiest option for renters, too, because you don’t have to make any permanent changes to your walls or mirror.
I’ve seen hundreds of installations in the last 10 years, and the most common mistake people make isn’t wiring or mounting—it’s testing the sensor too early. The adhesive needs 24 hours to fully set before you start tapping the mirror, so if you plug in the adapter and try to use the sensor right away, it might not work. Give it a full day, and 9 times out of 10, that’s all you need. Another mistake: placing the sensor near metal pipes or other metal fixtures, which can interfere with the touch signal. Just keep it at least 6 inches away from any metal, and you’ll be fine.
What about long-term installation? Once it’s up, mirror sensor switches require almost no maintenance. You can wipe the mirror with glass cleaner, just like you normally would, and the sensor will work as long as the touch pad stays clean. If you do run into an issue (like the sensor not responding), it’s almost always a simple fix—check that the wires are connected tightly, that the power adapter is plugged in, or that the touch pad isn’t covered in soap scum. I offer a one-year warranty on all my mirror sensor switches, and I’m available to answer questions at any time, even for people who bought them from another supplier—part of being in this business for so long is knowing that customers need help, not just a product.
Now, let’s talk about why mirror sensor switches are worth the small bit of effort to install. They eliminate the need for clunky wall switches that get in the way of your mirror, they’re more hygienic than flipping a switch with your hand after using the bathroom, and they add a sleek, modern look to any bathroom or dressing room. I’ve had customers tell me they installed one in their master bathroom and it changed their entire morning routine—no more fumbling for a switch while holding a coffee cup, no more leaving fingerprint smudges on the switch plate. That small convenience adds up, especially in a space you use every day.
If you’re still on the fence about installing one, here’s the bottom line: For most people, mirror sensor switches are extremely easy to install, even if you’re not a DIY expert. The process is straightforward, the components are safe and simple to work with, and there are almost no permanent modifications needed. The only times it’s more complicated are if you have an unusual mirror, a high-wattage light, or you want to hardwire it instead of using a plug-in adapter—and even those situations are fixable with a little extra research or help from a professional.
If you’re ready to upgrade your space with a mirror sensor switch, I encourage you to reach out to discuss your specific needs. Whether you’re a homeowner looking for a single unit for your bathroom, a property manager outfitting multiple units for an apartment complex, or a contractor working on a commercial project, I can help you pick the right model, send installation guides, and answer any questions you have about the process. Don’t let the small “what ifs” of installation stop you from getting the convenience and style a mirror sensor switch brings— it’s a small project that makes a big difference in your daily routine.
Cabinet LED Driver References:
- National Electrical Code (NEC), Article 725: Low-Voltage Wiring, 2023 Edition
- International Association of Certified Home Inspectors (InterNACHI), “DIY Electrical Project Safety Guidelines for Homeowners”, 2022
- Mirror Manufacturers Association, “Glass Compatibility Guidelines for Touch-Activated Devices”, 2021
- U.S. Department of Energy, “Energy-Efficient Lighting for Residential Spaces”, 2022
- Consumer Product Safety Commission (CPSC), “Low-Voltage Electrical Device Safety Standards”, 2020
Dongguan Lanbaoli Intelligent Technology Co., Ltd.
As one of the most professional mirror sensor switch manufacturers and suppliers in China, we’re featured by quality products and low price. Welcome to buy advanced mirror sensor switch for sale here from our factory. If you have any enquiry about quotation, please feel free to email us.
Address: 10th Floor, Building 32, Golden Town, No. 7 Technology Avenue, Houjie Town, Dongguan City, Guangdong Province
E-mail: anna@lampow.cn
WebSite: https://www.lblsensor.com/
